Manage Orders with Jumpseller
We know that sometimes our merchants have to deal with unexpected changes in their orders so we have created a guide to help you understand the ord...
To sell in multiple markets, using local languages can be a big plus for an online store. With Jumpseller, you can easily manage both the storefront and the admin panel languages.
To configure the language settings click on Languages on your Admin Panel Sidebar.
Once here, you can see the default language your store is using that depends on which local you used to create the store! For example, if you created a store from Jumpseller.pt your store will be create in Portuguese. If the store is created in any language other than English, you will have by default 2 languages added,as English is the language of our store code.
Here you see by default Portuguese was set as the Main Language of the store.

If you want to add another language, you can do so by selecting the language from the list and clicking on the Add button next to the selector.
The number of languages you can add depends on the subscribed plan:

Once the language has been added you can set it as Main Language. Simply click on the 3 dots corresponding to the language and you will see the option.

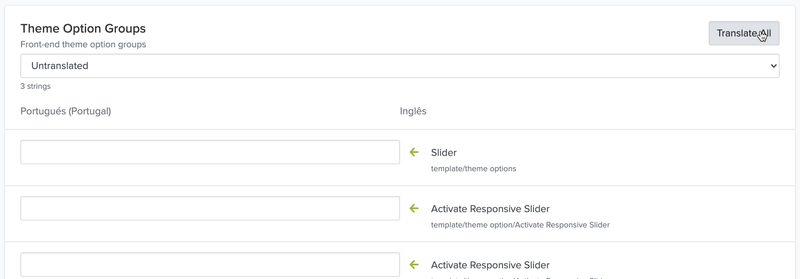
After a new language has been added, you can click on that language and you will get a list of sections from the store with the terms and words from that section in English. You can translate these sections manually or automatically. You can also see the Translated and Untranslated strings here.

To translate manually, you can simply write in the text box your desired translation for a specific word or sentence.


To translate automatically, you will need to click on the Translate All button on the right side towards the top.

If you add a new text section to your theme from the Code Editor, they should also be available here if you put the translation tag “t” on the code.
To delete a language, click on the Actions button and click Delete.

If you want to use different images depending on the language your store is being viewed or the audience viewing it, you can also do that in this section of the admin panel.
Let’s say you add a new product Running Shoe from the products section on the Admin Panel. You added an image of Shoe Sizes for the US, and clicked Save. Now if you added the image in the description box, you can just click on the text below which in this case is Translate to Portuguese.

You will now be at the exact element on the language section you want to be translated. Double click on the input box parallel to the image, here you can just upload the translated image, which in this case are the available shoe sizes for Europe.


This works exactly the same way for the other sections of your store such as Pages or Categories.
While we have the admin panel already translated in most languages, you can still suggest addition/changes to those translations. In order to do that, you can access the admin panel text here: https://translate.jumpseller.com and login with your store credentials.

Once you have added a new translation you need to wait for it to get Approved by a member of our team. After approval, it will be available online.
If you have any further questions you can always contact us.
Start your free 7-day trial. No credit card required.