Master Jumpseller Automations and Enhance Customer Engagement
Dive into the Email Automations feature. Learn how to set triggers, craft flows, and send timely emails to boost customer relations. Your guide to ...
Emails are automatically sent from your store based on the stage of the orders. You can customize these emails: turn them on and off, change the content and design, and define who receives copies of them.
To do that, in your admin panel, go to General > Emails and press the toggle button next to the emails you want to activate / deactivate.
By default all emails will come from the address “no-reply@jumpseller.com” displaying the name of your store. You can change this “from:” email to an existing one exclusively on the Premium or above Plans.
On this guide, you will see what are the emails that can be triggered in your store and how to configure them.
Transactional Emails allow you to automatically send a pre-defined message to your clients when a certain event occurs:
Account Enabled: Email sent to the customers when the Account is enabled. There’s a button included that redirects to the store’s customer login page.
New Order: Email sent for every new Order made with a manual payments. It contains the payment instructions. Orders with automatic payments will not trigger this email, it will trigger only the Order Paid email if the payment is successful.
New Manual Order: Email sent for every new Manual Order created with the payment method option “Send email with checkout link to customer”. It contains the payment instructions and a link to complete the payment.
Abandoned Order Recovery (Only available on Plus Plan or higher): Email sent to customers that added products to their cart but didn’t complete the order, reminding them to complete the order. It contains a button that redirects to their cart and allows the customer to finish the purchase. Alternatively, you can also use the Recover Abandoned Orders with MailChimp, which is available on all plans.
Order Paid: Email sent when an Order is marked as Paid. If the order contains a digital product, it will include a download link.
Order Shipped Email sent when an Order is marked as Shipped.
Order Ready to be Picked up: Email sent when an Order is ready to be Picked Up.
Product Review: Email sent with a review form after an order is delivered.
Order Canceled: Email sent when an Order is marked as Canceled. A link is included to repeat the order by adding the same products to the cart.
You can choose which email addresses will receive information when a specific event occurs in your store. For example, if you have different roles defined for your store you can choose to include specific roles to get notified via email.
New Contact: Email sent to your email address when your customers contact you.
Low Stock: Email sent to your email address when your products’ stock is low.
Payment Notification: Email sent when a theme, domain or service payment is processed.
Review Status: Email sent to you weekly, giving an update on how many new reviews were submitted or are awaiting approval, as well as the top 3 best reviews and a link to check them all out.
New Customer: Email sent to you when a new customer creates an account.
When customers reply to these automatic emails, you will receive it on the email defined as “Contact Email”, which you can change by scrolling down to the “Settings” section of the emails page.

If your store is subscribed to the Premium or above Plans, you can also change the email address through which transactional emails are sent to your customer, from the default “no-reply@jumpseller.com” to another one.
However, before changing to another email address, please take into account the advantages of using the default email address “no-reply@jumpseller.com” as a notification email, namely:
Our domain (jumpseller.com) has been certified by Google, since we are a reputed e-commerce software company, thus allowing us to display extra actions on our emails. When you use your own domain, you lose the Google Mail (Gmail) functionality that allows your order emails to display extra actions and information to your customer, read more here: email markup documentation and google markup documentation.
Our domain (jumpseller.com) holds authority within the email servers, because it has been sending thousands of emails over the span of many years. It’s very likely that sending emails from new domains will result in having them marked as spam for a couple of months.
Advanced Tip: You can also use this value on the HTML of your store, with the liquid tag {{contact.email}} .
By default, the store creator will be BCC’d in all emails. You can change this behavior by clicking on every email template and modifying the “notified Email Addresses” field:

You can add multiple emails by clicking inside the field box next to the other email, type down the new email address and press “Enter” on your keyboard.
Here you can choose if you want to send the email to all customers or just the ones that “accept marketing”. In certain countries, businesses must show an opt-in to customers about receiving emails.

You can edit the subject of each email template by ticking the box on the right and clicking “Save”. To revert the email subject back to default, click on the button below, “Reset Subject”, and save.

To add a promotional code at the end of your emails, toggle the “Send discount code with email”. You can select which promotion to display (only promotions that have the “discount with coupon” option activated are able to be selected).

Although you can choose a previously created promotion, we recommend you create a new one just for these emails, this way you will know for sure how many customers used it from this specific channel.
To check on this metric after, go to “Promotions”, select the specific promotion you chose for the email and see the “Discount Summary”.
You can alter the design of all of the emails with the exception of the “New Contact”, using the Email HTML editor.
A live preview is also available in case you want to confirm the results of your changes. First, edit the email address where you would like to receive it and then click “Send”.

To start editing, tick the “Modify the outgoing email. Requires HTML/CSS knowledge.“ box and click on the “Edit” tab.

Now you can start editing sections of the email such as, for example, the text that is shown next to the discount code, as well as the rest of the email.
Anytime you want to see how your changes affected the email, you can click on the other tab, “Preview”, to see how it currently looks.
In case you want to make any manual translations to the content of the email, you can go to General > Languages and search for the text you want to translate.
Once you are done making changes, don’t forget to click “Save”.
In case you made several changes that you would like to revert, you can always click “Reset Template” and the email structure will go back to the original template.
Advanced Tip: You can use store variables for orders and ordered products to customize these emails. See more information on this Liquid and HTML guide.
Since the administrator emails are related with the management of your store, there is a focus on which email addresses should receive certain information as well as the subject of those same emails.

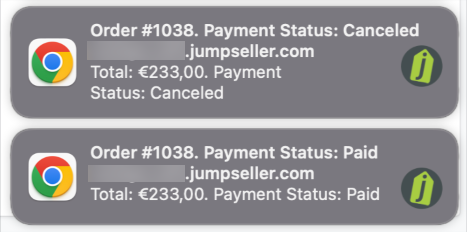
Push notifications are clickable messages that are sent by a website to their subscribers’ web browser.
If a customer places an order and you are logged in to your Admin Panel, your web browser will notify you of that order.

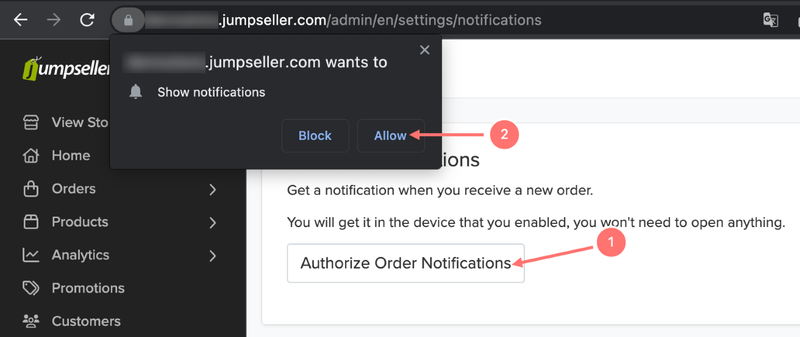
You can enable this option in your store’s Admin Panel by going to General > Notifications, clicking “Authorize Order Notifications” and “Allow”.

Every Jumpseller store has the option to communicate with other services or websites whenever a specific event (like an order payment) happens. You can configure these hooks in your Admin Panel: Settings > Notifications, select the type of hook, callback path, hook name and click “Add”.

After that, you can always test it by clicking on the button that has an “airplane” icon next to it, or pause them by clicking on the pause button next to it. Read more information on our webhooks guide.
I cannot receive emails from my store’s Contact Form or Sales Orders. Why?
Due to the great number of emails sent by our email (noreply@jumpseller.com) spam filters, especially Gmail, might mark them as SPAM. What you should do is:
My emails are not being sent/ I’m not getting notifications at all? How can Jumpseller’s support help?
There are many reasons for an email not being sent. First, we need to confirm there’s not a problem with your email inbox and use our own email, support@jumpseller.com, to test it out.
Please do the following:
I’m not getting notifications when I make a test.
When you make a test using the same email as the one you configured in your admin panel as your default store email, you will not receive a dual notification since the system identifies you as a store owner/admin instead of a customer.
How can I edit the translations of my emails?
Our platform comes with default translations for most languages. However, if you wish to customize the wording, follow these steps:
If you are missing a specific string of text, you can enable email editing by following these steps:
If you have any further questions, you can always contact us.
Start your free 7-day trial. No credit card required.