Products Admin Panel On Your Online Store
Get to know all the features available in the product admin panel of your store to get the most of it.
An important aspect of starting an Online Business is adding and listing your products. Depending on the products you are selling, you can create a suitable product page with pictures, details and variants, among other details.
Let’s go through all the steps to configure products on your Jumpseller Store.
In order to access to the Products section, go to Admin Panel: Products > All Products. If there are no products, you will see a “No Products Yet” message.
You can Add Products manually or you can directly import them using a CSV file with your existing product list.

If there are products already listed there, you can click on “Add Product” on the top right corner to add your new products.

Once you are in the product creation view, you will see different sections with several input fields:
Every product listing begins with basic information about the product. This includes the product name.

Creating a good product name is key to grabbing customers’ attention, giving a hint about what your product offers, and aiding our machine learning algorithms in product search and recommendation systems. Here are a few general principles:
A good eCommerce product title should be clear, concise, and informative. It should include necessary details like the brand, the product type or model, key features or specifications, and any other attributes that help customers make purchase decisions.
Also a good product name not only aids in better customer experience but also optimizes the functionality of our advanced machine learning algorithms for product search, and recommendations.
Product categories are crucial to organize your products and facilitate easy navigation for your customers. Categories also play an essential role in improving the effectiveness of our search and recommendation algorithms. You can select existing categories or create new categories depending on how you want to categorize your products.

Each product category you create can have subcategories as well. By selecting the parent category, you can create subcategories to further organize your products.

Here are some tips for effective categorization:
Be Specific: Make your categories and subcategories specific to help customers find exactly what they’re looking for. For instance, under the main category “Shoes”, subcategories could be “Men’s Shoes”, “Women’s Shoes”, “Children’s Shoes”, etc.
Keep it Simple: Categories should be easily understandable and not too complicated. Avoid using industry jargon that a customer may not understand.
Consider SEO: Optimized category names can enhance your store’s SEO performance, helping search engines index your products better.
Hierarchical Structure: Create a logical and easy-to-follow hierarchical structure for your categories and subcategories. This not only aids navigation but also improves the effectiveness of collaborative filtering, as similar products would be grouped together.
Consistency: Ensure consistency in how you categorize your products. For example, if you categorize by type in one area, it may be confusing if you categorize by brand in another.
Utilize Product Attributes: Use product attributes like brand, size, color, etc. to create subcategories. This adds another layer of organization and can help the search algorithm to retrieve more accurate results.
By using effective categorization, not only can customers easily navigate through your online store, but you can also leverage our machine learning technology like collaborative filtering for improved product recommendation and proximity searches for more accurate search results. The more detailed and logical your categorization, the better these systems can work to provide customers with an optimal shopping experience.
With the use of our description editor, you have the ability to enrich your product descriptions with HTML, add widgets, files, and more. While this step is optional, it can significantly enhance the visual appeal and functionality of your product listings.

Beyond these enhancements, our platform is leveraging the power of AI to streamline the process of crafting compelling, unique, and SEO-optimized product descriptions. Built upon Chat GPT, our generative AI technology takes basic inputs about your product, such as its name, categories, and a brief description, and uses this to generate dynamic and engaging descriptions.
Note: This feature is only available to subscribers of the Plus plan and above.

In the past, creating effective product descriptions was a manual and time-consuming task. However, generative AI technology has revolutionized this process. Here’s how:
Moreover, accurate and detailed product descriptions improve the effectiveness of machine learning algorithms like collaborative filtering, proximity searches, and autocomplete functionality, enhancing the shopping experience for your customers.
While AI does most of the work, following these practices can enhance your product descriptions:
By combining the power of AI with these best practices, you can craft product descriptions that not only engage your customers but also boost the effectiveness of our search and recommendation algorithms.
There are three possible statuses in Jumpseller:

This option tags your product as “Featured”. Depending on the template you’re using, your products can be displayed prominently on your website, for example, in your homepage slideshow.

For each product, you can upload as many images as you need. The first image on the top left corner is used as the main image and, depending on the template you are using, it can be the biggest one.

If you want to select a new main image, upload it and then just drag & drop it to the first position from left to right. You can reorder the images in the image list.
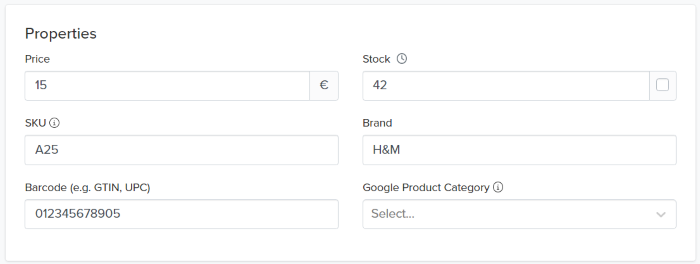
Here you can set the price of the product, define the Stock (tick the box to set an infinite number) and add a Stock-keeping unit (SKU), which is a number or a code that identifies each unique product or item for sale. You can also add the brand and barcode of a particular product, and set the Google Product Category (this information is used for Google Shopping and Facebook integration).
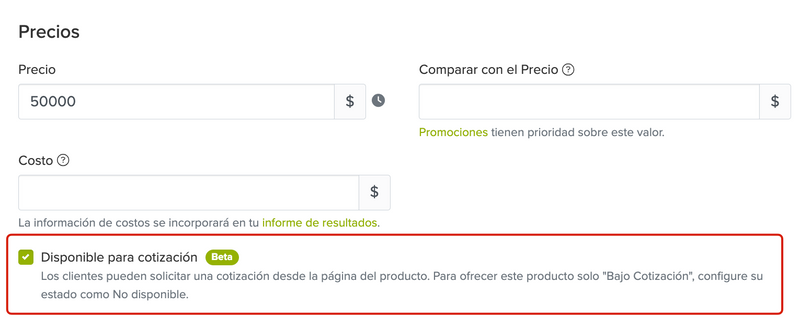
When you enable this option, your store will display a “Quote” button on any product page where you activate it, whether the item is in stock or unavailable.
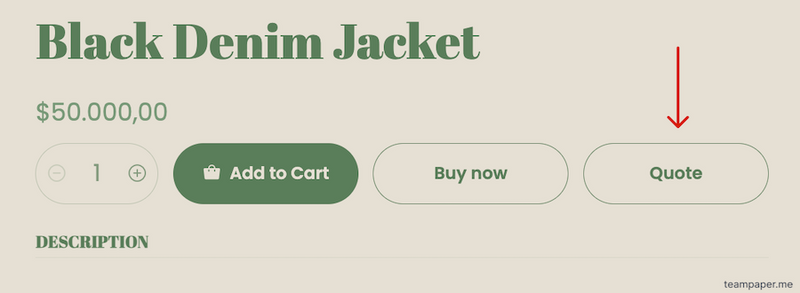
Customers can gather multiple products, adjust quantities, and submit their information through a quotation form. Each request is sent to your store’s contact email, including full product details, helping you respond faster and close more sales.
If you want to add a condition to a product, such as Minimum or Maximum quantity required to complete the purchase, you can do so with this option.

Minimum Quantity condition is mostly used in cases where the profit margin for an order depends on a certian no. of units sold.
Maximum Quantity condition can be for situation where a merchants has limited edition products, so as to avoid scalpers (a person who resells at a large or quick profit).
At the moment, the min and max quantity applies to products, so, if a product has variants, the limits will apply to all variants too. It is not possible to set specific min and max quantity for each variant.
In the following example, you can see a purchase condition applied to a minimum quantity. That condition is reflected on the product page as the quantity is set to the minimum required. If the buyer does not meet a set requirement, they cannot proceed. In this case, a small message will appear on the screen informing them of the required action to proceed to checkout.


This feature enhances pricing transparency and provides an easy, effective way to underscore the value of your products.
With “Compare At Price”, you can display a reference price alongside your actual selling price, offering customers a clear comparison and context for the price they’re paying. Although it’s not a traditional promotional tool, “Compare At Price” can be used to subtly emphasize the comparative value of your offerings, thereby encouraging purchases.

To utilize the “Compare At Price” feature, simply input the reference price when creating or updating your product listings.

For products with variants, the “Compare At Price” must be added to each variant individually. To do this, navigate to the Variants section and select “Show Full Results” to access the extended variants options screen.


If you have a batch of reference prices to import, you can easily do so by following our import guide.
Please note that when sorting collections, Jumpseller will prioritize the actual selling price, not the “Compare At Price”. This ensures that customers get an accurate view of your products based on their current prices.
Note: Promotions override Compare at Price, which means, if you have a product with an active promotion and a Compare at Price value, the discount calculation shown on the product page will be based on the promotion. Please view the example below to better understand this behaviour.
Let’s look at “Product A” under different pricing configurations.
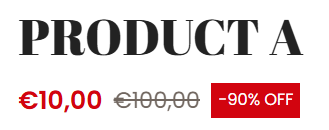
You set the compare at price field for “product A”:
In this case, the system will:
Final Display: $10.00 $100.00 (90% OFF)
You set the compare at price field for “product A” and created a promotion that includes the product:
In this case:
Final Display: $8.50 $10.00 (15% OFF)
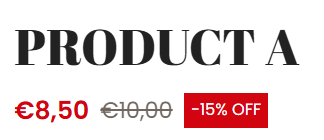
This pricing hierarchy ensures customers see the most relevant and current discount available for the product.
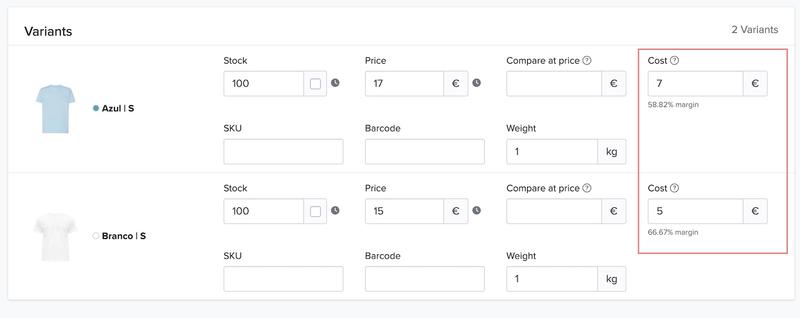
In the pricing section of each product, you can now add the cost price for each item, which refers to the original purchase price or production cost of a product.

This feature is only visible to the store owner and its purpose is to provide a clear view of the profit margin for each product, allowing you to assess the profitability of your inventory.
To access this information, go to your Admin Pannel > Analytics > Reports and check the Profit (margin) column.

To add the Cost for products that have different variants, you need to enter the cost individually for each variant. To accomplish this, go to the Variants section and click on Show Full Results to access the expanded options screen for variants.
Edit shipping properties for physical products, such as package format, weight, width, height and length. These values will be used when estimating the shipping cost at checkout.
For digital products, since there is no shipping involved, you can simply upload a file.


To add further details to your products, you can use the Product Options to add color, size, and material variations. These will generate variants for which you can set specific properties (SKU, price, stock, weight).


You can edit and sort them by clicking on the “Edit/Sort” button and dragging each option to your preferred position.

If you want to sell Digital Products, such as music, software, Ebooks, among others, tick this box. This will hide all the shipping-related fields, and it will enable the upload of the product’s files which will be private and only sent to the customer after the purchase is complete.

You can also create a Custom Field for any product by specifying its label and type. These custom fields can be shared across all the products. However, you will need to add every custom field and its respective value to your products manually.
To create a new custom field, click “Manage Custom Fields”.


If you have additional information about a product on an external file (for example, in a PDF), you can upload it here and it will appear as a downloadable option on the product page.

Your store is already confirmed to be SEO friendly, but you still need to add the relevant data for Google to index your pages. Click “Enable edition” and set the Page Title, Meta Description and edit the URL.


How to manage the stock of my products?
Managing stock can be a daunting task, especially if you have a huge amount of products. Some options to manage your inventory better are:
Edit your stock inventory in your Admin Panel. We do a simple inventory control;
For stores with hundreds of products, you can use our Import/Export Products to CSV option. We suggest you to first export your Product data, edit it without changing the file structure and then upload it again;
How can I add a Video to my Product?
It is possible to add videos to your Product’s description by embedding them:
Copy the video embed code from Youtube or Vimeo (or whatever service you use).
Go to your Product Details Page.
Click Add Video as below:

Start your free 7-day trial. No credit card required.