Brand marketing with favicons
Favicons help you make your website stand out! You should always use them to look more professional and help make the user experience better. They ...
If you have the Pro or Premium Plan, you can enable the Abandoned Order Recovery Email feature from the Emails section under Settings on the admin panel.
Another way to send the Abandoned Order recovery email is by using the MailChimp App from the Apps Gallery, a feature which can be used by All Plans.
Important Note: The MailChimp Abandoned Recovery email is different from the default Jumpseller Abandoned Recovery email in the Emails section. If you have them both enabled (Pro and Premium Plans), it means that there will be two sources sending recovery emails to customers with Abandoned orders, at their scheduled times, which can hurt your spam ranking. In order to avoid this, you can turn off the Abandoned Recovery email from the Jumpseller Emails menu under Settings.
Before you can create a campaign, you need to sync your Online Store with MailChimp. To do this simply install the MailChimp app, after installation, you should see the following empty fields.

Next, you need to go over to the MailChimp site and create your account, once the account has been created, you need to create an API key. Go to your profile on the top right and click on Account.

Here you need to go over to the API keys section under the Extras menu.

Click the Create A Key button.

Copy the generated API key.

Paste it on the MailChimp API key field on your admin panel. And click on Import Store to MailChimp.

Once your store has been imported you should see the Green Connected Site text on the MailChimp account.

Now you can click on the Create button to get started with your campaign.

Select Email.

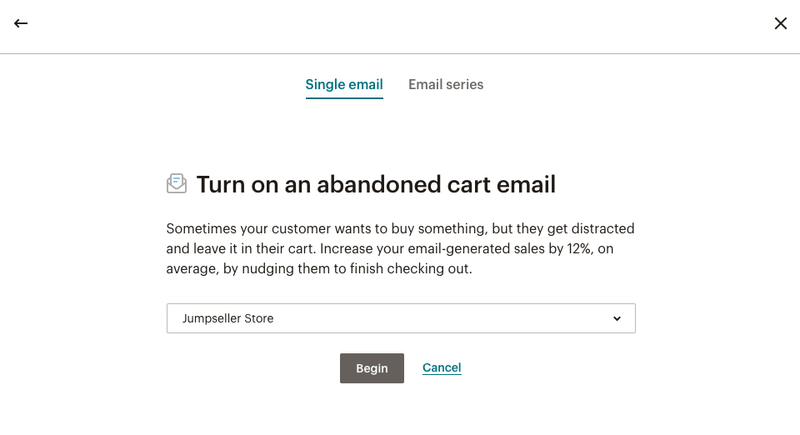
Click on Automated and then E-Commerce, then the Turn on an abandoned cart email option.

You should have two options here, to create a Single email or Email Series, select whichever you prefer.

Now you should see the section with customization options, you can choose the subject line, edit recipients, when to schedule the email and other options. To choose the Design of the email, click on the Design Email button.

Here you have options to select a template or you can even create one of your own.

Once you have selected a template, you will have further editing options to change the text of the email itself.

You can Enable live merge tag info to get a sense of what will happen once the email has been generated, Note, the products shown here are just sample products to give you an idea of the overall email.

Once you are done, click on the Save and Continue button and then you can click on the Start Campaign button at the top.
Please note emails will not be sent retroactively to your Abandoned Orders list prior to starting the MailChimp campaign.
Start your free 7-day trial. No credit card required.