Manage Orders with Jumpseller
We know that sometimes our merchants have to deal with unexpected changes in their orders so we have created a guide to help you understand the ord...
A big part of selling online is through shipping all the purchases your customers make. Jumpseller offers everything you need to be able to do this in a simpler way. Putting a product in your customer’s hands is a process that has two specific moments:
The first step is to estimate the shipping prices to be charged to your customer for each purchase. To read more about shipping estimates, see our support article How to Set up Shipping Rates.
You can view the fulfillment processing status of each order by going to the Admin Panel > Orders > All Orders.

There are two ways to process your order fulfillment: manually or automatically, through our fulfillment tracking integrations.
In a manual fulfillment, a label is generated with the fulfillment information to put on the package (this is something as simple as writing the shipping details by hand on paper and sticking them to the package).
Then, take the package to the nearest office of your supplier and, once you have the data with an approximate delivery date and a tracking number, send this dispatch manually to your store, to provide this information to your customer.
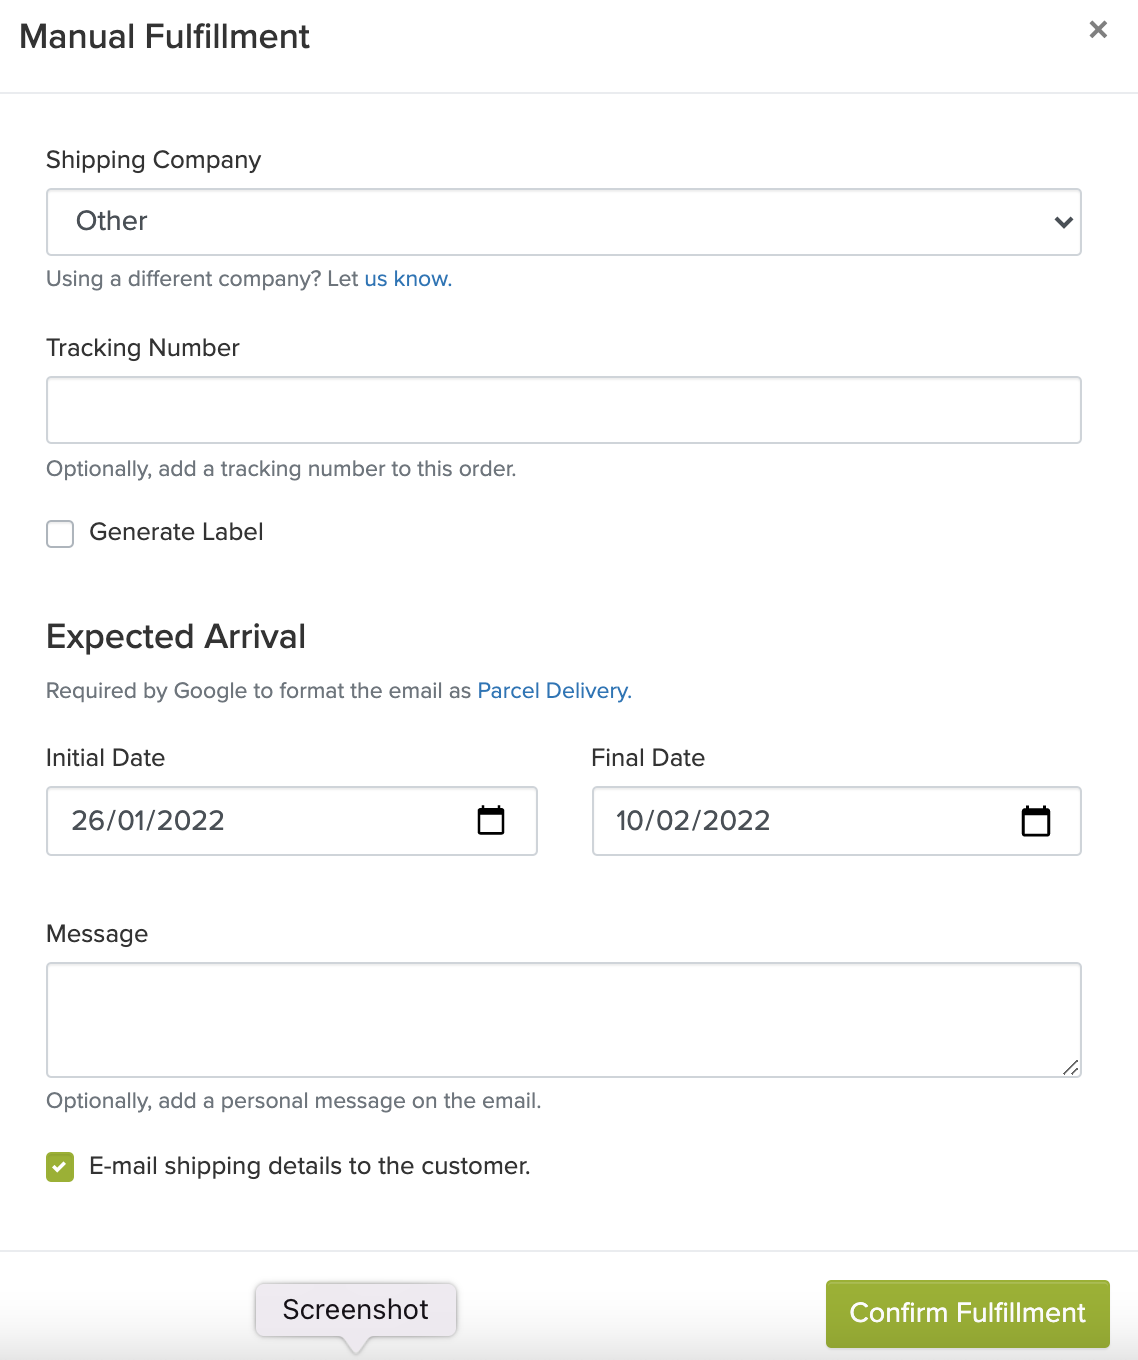
To do this, in the Admin Panel of your store, go to Orders > All Products and you can click on the order number to the left of the date. Then, enter the order data, selecting the “Manual Fulfillment” option.

A pop-up window will then appear, where you must fill in the data:

You can choose a shipping company from the list. If the company you use is not on the list, you can select “Other”. This type of processing provides a fulfillment status of “Fulfilled” to the order and your customer receives the corresponding information in your email.
If your customer wants to know the fulfillment status of this order, he can track it with the corresponding number on the service provider portal.
Manual fulfillment is also suitable for processing Store Pickup. In the accompanying message, you can write: “Store Pickup”.
The Automatic fulfillment is done using our integrations. These allow you to automatically generate and print a label with the shipping data of the order, generate a manifest (proof of request for a shipping service), request the pickup of packages at the business address (subject to conditions), track the dispatch for shipments and see its status change (requested, processed and delivered) in the Jumpseller panel itself. If you want to know the fulfillment status of this order, you can do so at the store.
Processing an automatic fulfillment is very similar to processing a manual fulfillment.
On your Admin panel, click on the Orders > All orders tab on the sidebar and you will arrive at the page seen below. Here you see all the details of the orders taken by your store, including the Payment and Fulfillment statuses. As you see in the image below, the latest order is “Unfulfilled” and the payment status is “Pending”.

If the order has been successful, you can click on the order number to the left of the date (in this example: 3764) and you will arrive at the page you see below. Here you see the details of that specific order. On the top right, you can see the tab “Pending”, just click on it and change it to “Paid”. Then you need to click on the green button “Integrated Fulfillment”.

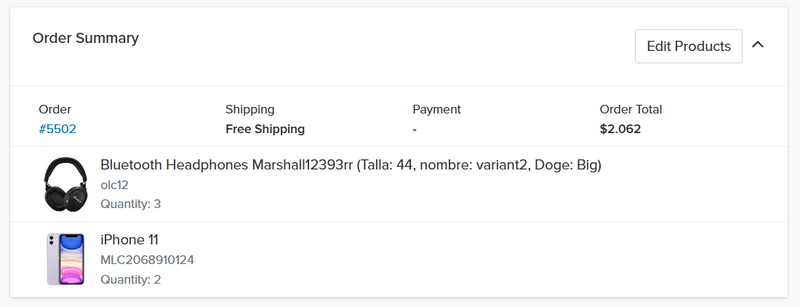
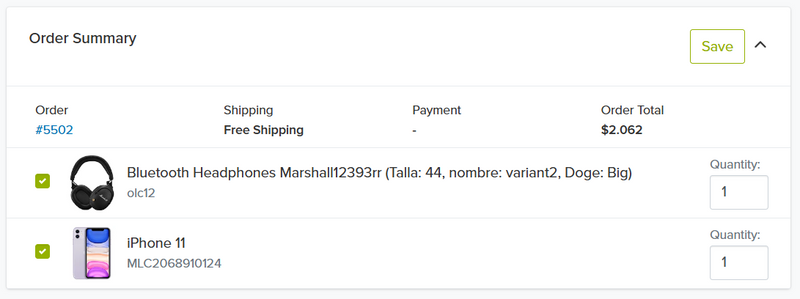
On the new page that appeared, you can start by choosing whether you want to ship all the products from the order, or just some of them, by clicking on “Edit Products. This section lets you select specific items or quantities to fulfil now, while leaving others for later. You can take advantage of this when handling out-of-stock items, different shipping requirements, or complex orders that need to be split into multiple shipments.


On the next section, edit the dimensions of the package by clicking on the button “edit” and then “save” after you are done.

The form below the package dimensions displays the shipment information. It is already filled by default with the information given by the customer, but you can edit each field.

Once you are done checking the details, click on “Estimate Fulfillment” in the bottom of the page to go to the next step.

In this page, you can choose which fulfillment company service you want to use for the shipment of the order.
The cost of the fulfillment is displayed next to each option so that you can compare prices between fulfillment companies.
On the right, in the order summary, you can change the estimated delivery date - this will be displayed in the email sent to the customer (the default date is based on past delivery data).
You can also see the total cost of the fulfillment (fulfillment company service cost + Jumpseller fee) below the fulfillment options.
Before clicking on the button “Fulfill” you can tick the box “E-mail shipping details to the customer”, so that the customer receives an email with all the details.

In this last page you can see an overview of the label details and its fulfillment status.

Finally, you can go back to the Orders tab (left sidebar) and click on “All Orders” to see the updated order details. Under the Fulfillment column, the order status should appear as “Fulfilled”.

You can also use our E-mail Markup Guide to get perks like Parcel Delivery and Order Receipt. Your Jumpseller store is already integrated with the schema.org markup for emails. You do not need to do any setup to have this markup on your store emails.
To learn more about configuring and using shipping integrations according to your service provider, see the documentation for each of them:
After processing the fulfillment, your customer will receive an email with information about the order sent. In Jumpseller,schema.org markup is integrated, which allows you to generate advanced e-mails.
To use these integrations, you must decide whether to use your own contract with shipping service providers or use Jumpseller.
An own contract is an external contract, carried out by you directly with the company providing delivery services. In this case, you will be responsible for paying the shipments to the delivery company, having to pay Jumpseller a fee for using the service.
Stores that adopt this option do so because:
In the case of a Jumpseller contract, everything is handled by us. You will then have to pay us both the shipping price and the fees for using our service.
Stores that adopt this option do so because:

There is a cost per label printing that varies depending on the plan you are subscribed to at Jumpseller. Check the price list.
If you do not use our label printing integrations and use a manual method, there is no additional charge.
Jumpseller is always looking to improve the experience of our merchants. With that in mind, we have consolidated our label creation system, so that it’s faster to print, easier to fit into any page size and simpler to manage different fulfillment companies.
Instead of having different label formats for each of your fulfillment companies, we have created a standardized format that can serve all of them.
With this system, you can choose the default size of your labels (4’’ x 6” ou 4” x 3.5”) before creating them and how many labels you wish to have in each page.
This reduces the amount of time, cost and environmental impact when compared to the previous solution:

Follow these steps to set the label print size and how many labels per page you want:

Here you can select the default print size (4’’ x 6’’ (101.6mm x 152.4mm) or 4’’ x 3.5’’ (101.6mm x 88.9mm) for all your fulfillment labels and the number of labels that will be printed per page.
If you have a label printer, we recommend you to choose 1 label per page. For a regular printer you can choose 3 per page (for the 4” x 6” labels) or 6 per page (for the 4” x 3.5” labels).
You can click on one of the links below “Preview” to see an example of how your selected options will be applied when you print your labels.
Our system allows you to easily print labels for more than one order, as well as print more than one label per page even if they are from different orders.
For example, in an A4 page, you can fit 3 to 6 labels depending on the settings you chose in the label printing page. Each of the following 3 labels is from a different order.

How to do it:
In the side menu of your admin panel, click on Orders > Fulfillments. Then, select all the orders you want to print labels for, by ticking the box next to each of them.

Go to the Actions drop-down button and click on “Print in PDF” (works for all printers) or “Print in ZPL” (only works for label printers).

Finally, you will be redirected to a new page where the labels are shown in a pdf format.

In this case the labels appear each in their page because this store owner set the number of labels per page to 1.
What do you recommend for printing 4x6 labels?
R: We recommend you to use a Dymo Labelwriter 4XL printer, but other printers can also do the job well.
Can I print labels from different couriers in the same A4 page?
R: Yes, you can, as long as you have selected the option of having more than 1 label per page.
Is it possible to print labels in a different format than pdf?
R: Yes, if you have a printer that can read label information in the zpl format, you can print it in that format by clicking on “print label in zpl format” instead of clicking on “print label in pdf format”.
After we receive the invoice from the carrier and adjust the amounts, we will issue the corresponding invoice.
Considering that we deduct the estimated amount of shipments once a month, we will send the actual amount charged from the delivery service provider to Jumpseller after the shipments are made. In this case, a replacement will be made in your Admin Panel of the estimated values for those invoiced with the Jumpseller discount included.
You can view the details of your shipments in Admin Panel > Subscription and you will see something like this:

Each time we receive the invoice from the shipping service provider and adjust the values, you will see a descriptive record of the adjusted movements and also some icons that will allow you to download a detailed file of movements from Excel:

By clicking on the adjusted movement number link, you can see a detail of each one of them.
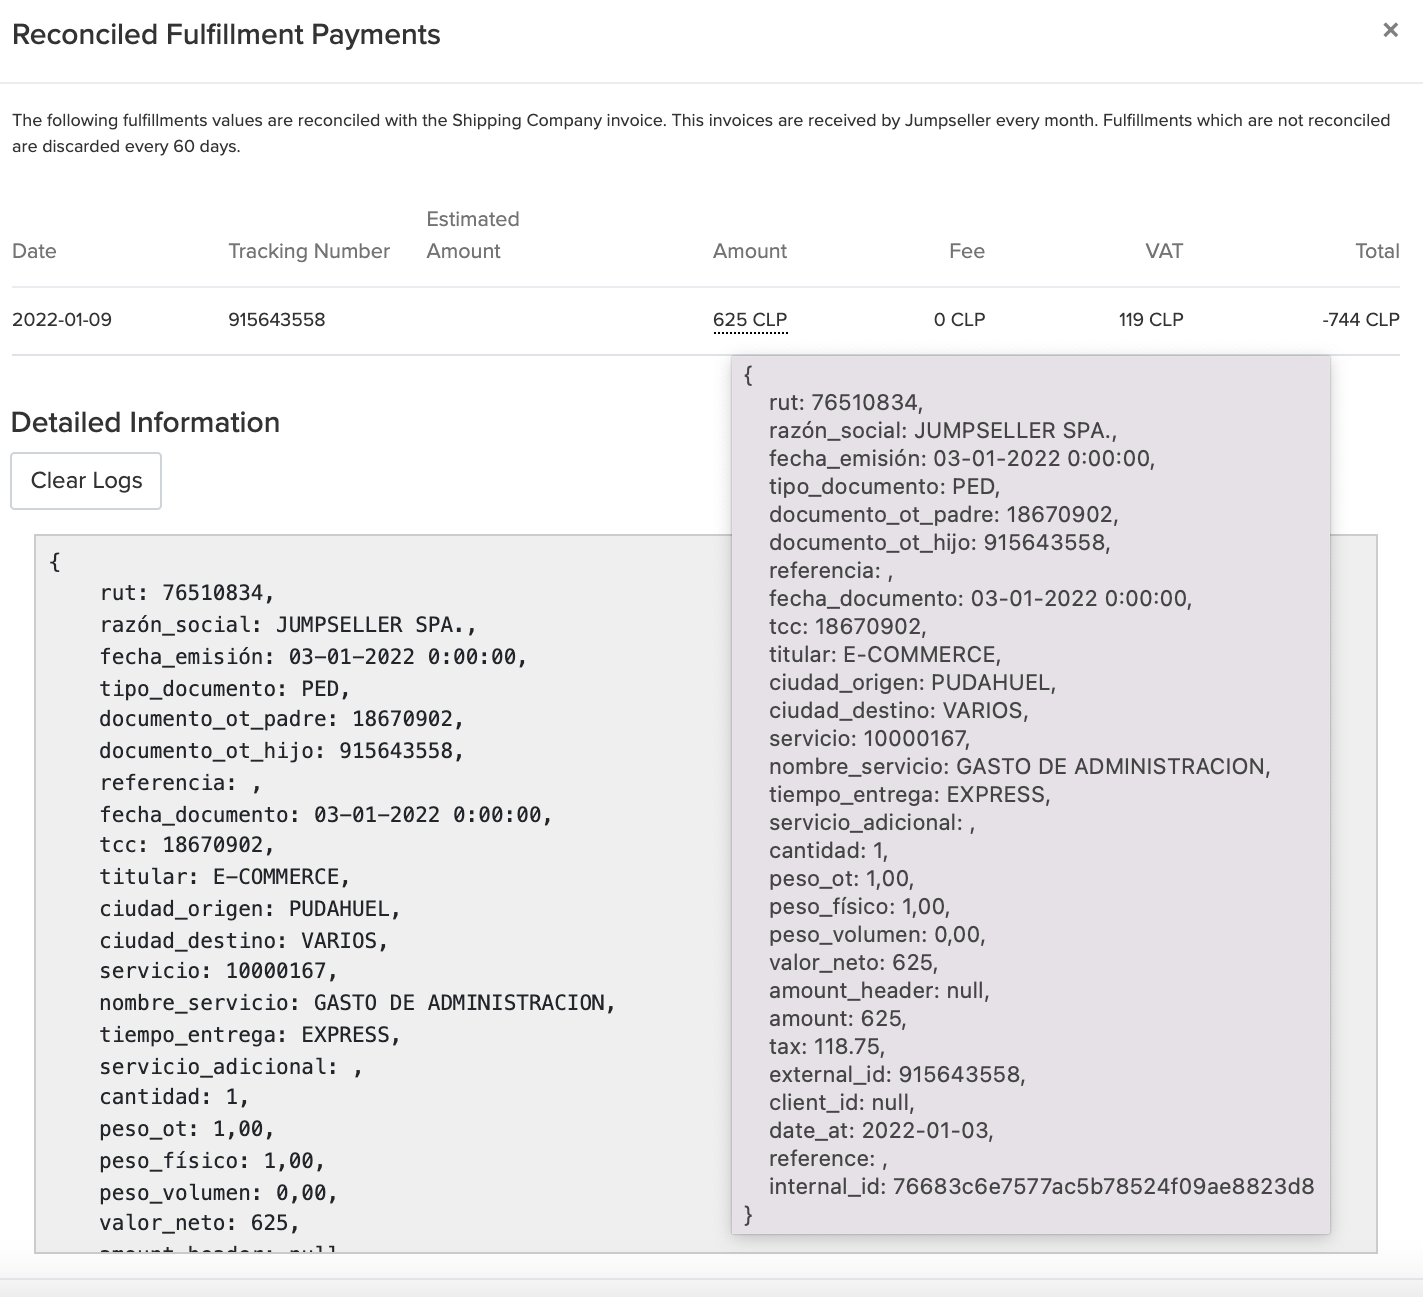
By hovering over a specific transaction amount (underlined by a dotted line), you can see the descriptive details received by the carrier.

This is important because the differences between the estimated values and the actual values can be presented here. The key fields are the OT weight, (calculated by the shipping provider or your store’s rate table), and the physical weight, (which is the actual weight calculated when the package is passed through the classifier at the shipping company).
The following figure best explains the Estimated Delivery Date process:

You don’t need this in order to use your Jumpseller store, however, these features will greatly aid you to manage your orders and save time, especially if you ship a considerable amount of orders per day.
No, we deduct the value of the generated credit card labels automatically.
Fulfillments are automatic shipments made through the Jumpseller platform, which inform the shipping company your store has packages to be picked up from your store/warehouse and delivered directly to the customer. Shipping is settings for estimating the prices in the checkout page of your store in order to charge the customer upon their purchase.
If you use the Jumpseller contract, you will be offered a discounted price for your shipments instead of the normal prices. We are working with companies we already integrate with to include discounts for all our customers.
It is not possible to import a rate table in an automated way; for this, you must use table rates that you build using the interface of your Admin Panel > Settings > Shipping > Table Rates. If you have questions about assembling one, please contact us.
This is a guarantee that the orders you are sending will be paid, as it is the Jumpseller who must pay the carrier the total amount of shipments.
At the moment you can only make transfers to our account, but in the near future we intend to automatically send these amounts to the credit card associated with your store.
It can take up to 48 hours to adjust the amount transferred to your store balance.
Yes. You can download all your invoices from Admin Panel > Subscription.
By using our contract, you receive special discounts on shipping fees.
The customers who register on your website can access their order history and status by logging in. They can also track the orders and check the estimated delivery date.
The value of the generated label will be deducted in the same way as the prepaid balance for shipments.
If you have any questions, please contact us anytime.
Start your free 7-day trial. No credit card required.