Tools to boost your online store and increase sales
These e-commerce tools can take a big chunk of the weight off your shoulders when it comes to management, design, marketing, and sales! Let us go t...
Creating a sales funnel in Google Analytics is an excellent strategy to study how your customers behave during the purchase process and determine if any of the stages is failing and you are losing sales.
In this article, we are going to teach you how to create a Destination Goal to analyze how your customers are behaving throughout the purchasing process. This will allow you to take action, improve each step and make sure you keep your customers buying from you.
In order to do this, your store needs to be connected to your Google Analytics Account. Please check this documentation on how to connect your store to your Google Analytics Account
This is the first step you have to take. A conversion goal is a specific action your customer performs that means a conversion to you and to Google Analytics. In an e-commerce store, a sale is the most important conversion of all.
There are three types of goals:
The buying process in Jumpseller has 4 stages, each one of them with its own URL (this is important to know in order to build your sales funnel in Google Analytics).
| Stage | Jumpseller URL |
|---|---|
| Cart | /cart |
| Checkout | /checkout |
| Order Review | /checkout/revieworder |
| Succes | /checkout/return |
To create a Conversion Goal:
Go to your Google Analytic Account and click on the left menu: Admin -> Goals

Click on New Goal button.

Then, on Goal Setup, you can choose between a Template Goal or a Custom Goal. Let’s choose a Template Goal: Revenue -> Checkout Complete. Then click on “Continue”

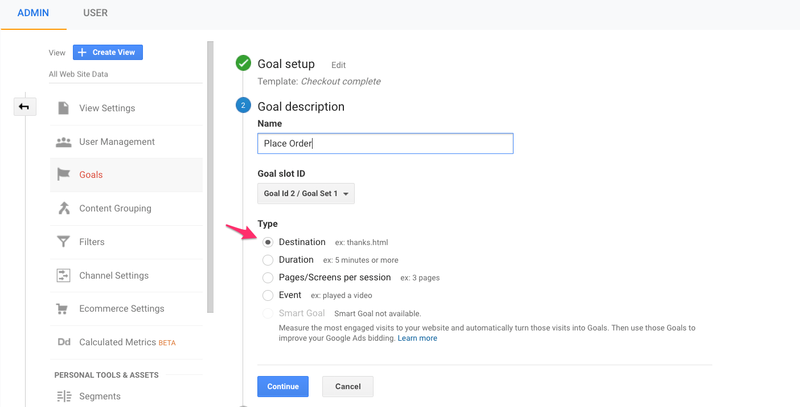
Write a goal description or leave the one that comes by default Place an order, choose Type Destination and click on Continue.

Now we are going to set up the goal details:
Destination will be the last page your customer has to visit to make sure you got a conversion (a sale). That would be the success page. In Jumpseller, it is the page with the URL: /checkout/return
Set Funnel on.
Configure each step of your funnel in the right order to get to the success page of your conversion: first Cart, next Checkout, then Review Order. You can name them the way you want but we recommend you use names related to them so you can make your report easier to understand. Make the first step Required.
Your goal details screen should look like this:

Save your Goal. You are all set! You have to wait at least 24 hours to get data flowing from your store.
On your main menu (left side of your screen), go to Conversions then Goals and select Funnel Visualization.

You will get a view showing the behaviour of each step you added to your conversion goal. It will look like this:

To view the conversion rate for set goals:
1) Go to Conversions 2) Select Overview 3) Select the goal you want to see data from.

If you have further questions or want to learn more about Destination Goals, visit Google Support
Start your free 7-day trial. No credit card required.