Using the WhatsApp Conversational Commerce to Boost Sales
This is an app that sends order notifications to the customers that opt-in for that choice during checkout. It exclusively uses a Jumpseller number...
When active and configured, the Facebook Messenger App will automatically send your clients messages in the case of the following events:
During the setup process, the App will need to get the permission to access your store’s Facebook Page, and use it to send the automated messages.
In order to activate the Facebook Order Notifications App and its full functionality on your store, you will need to fulfill the following requirements.
This way, the App can gather the necessary permissions to send messages through your page.
The first step is to install the app itself on the Applications section of your store’s admin panel.
Go the the Apps section of the admin panel.
Under the Gallery tab, search for the Facebook Order Notifications App.

Move your mouse over it and click the I Want to Install button.
After installing the app, you need to perform the following 3 steps.
Press the Log In to Facebook button. This will open up a dialogue section where Facebook will ask you to grant the App the permissions needed to continue after you log in.
After successfully logging in, a new section will appear, with two fields.
Select Facebook Page : The app will automatically retrieve the pages associated to the Facebook account you just logged in with. In this step, you should select the page you want to use with the App. This should be your store’s Facebook Page.
Opt-In Message : You can customize the message your customer will receive as soon as they opt-in to the feature. This message will be sent along with a receipt for their purchase.
After completing the two steps above, you can click the Save button to confirm your selections. This will generate a code snippet that needs to be part of your online store. See the next section for details.
After completing the setup and saving your settings, the App generates some code that needs to be included in your store.
If you have recently changed the theme of your store (November 15th 2017 or later), this code is already included and this step is not necessary.
However, you will need to manually include it in your store if you have a customised theme or haven’t changed your theme in a while.
This step is necessary so that customers see the Send to Messenger button after completing their purchase and are able to opt-in to the features.
The code should look something like this.
<div id="send-to-messenger" class="fb-send-to-messenger" data-ref=></div>
To find where to place this code, start by going to the Code Editor on your store’s admin panel.

Once in the code editor, navigate to Payments -> Success

The section you just navigated to contains the code for the Success page, which customers see after they finish a purchase. Pasting the generated code on this file will enable the Send to Messenger button to appear on the success page.
The code can be pasted anywhere on the page. Depending on where it’s pasted, it will show up on different sections of the success page.
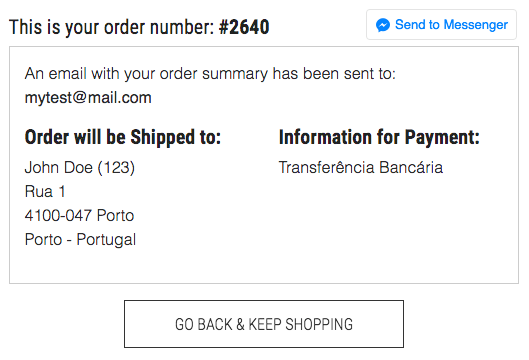
After everything is setup, customers can opt-in to this feature by clicking the Send to Messenger button on the checkout success page.

This will trigger the App to send the customer the custom message that was set along with a receipt for their purchase. The customers will also be signed up for further updates on their order.
While the Facebook Messenger App does not create automated replies to customer messages, it does open a communication channel between the customer and the store’s Facebook Page. The customers are able to ask questions while the merchants are able to respond via their store’s Page.


Free trial for 14 days. No credit card required.